
In this post, you’ll walk through setting up a Raspberry Pi that will send alerts whenever water is sensed (you can even have multiple sensors, each triggering a specific alert). What kind of alert? This post will walk you through setting up an email alert and a text/SMS alert (these can cost money). If you have other ideas, though, you will find it pretty easy to add the more “technical” alerts (like an IRC Chat message) or straightforward alerts like a buzzer. That is, this post is not just about getting something up-and-running but also learning how it all works so that you can fix, modify, reshape, etc. should you want to!
This post assumes no experience with electronics and a basic understanding of the Python programming language.
Outline:
- Parts – the hardware side of this project
- Setup – a link to setting up a Raspberry Pi and then steps to follow to connect the moisture sensor to the Pi
- Code – installing dependencies and then using Python 3 to write a simple notification system
Parts:
- A Raspberry Pi – you can use any Raspberry Pi as the Raspberry Pi OS is backwards compatible with all versions of the hardware. The code in this post is not specific to any type of Pi.
- A MicroSD card – Anything 8Gb or above is fine… I can’t barely find 8-Gig cards anymore as 16Gb has become the new ‘smallest’ card I can find. As this is a pretty simple project, a super high performance card is not necessary – any basic card will do. Search for “microsd card”. And yes, they are about the size of a fingernail!
- Power Supply – This will be specific to the Raspberry Pi you are working with as the older units use the “Micro USB” type power ‘plug’ while the newer units use “USB C” type power ‘plug’. It is recommended that the power supply provide at least 2 amps – since the Pi uses 5 volt power supplies, this means a minimum of 10 watts (watts = volts x amps). So look for either 10 watts or 2 amps.
- If you intend to plug a screen, keyboard, and mouse into the Pi for using/programming it (as in, you do not want to “SSH into the Pi” / using SSH is an unknown concept to you at this time), then…
- Keyboard and Mouse: you can use USB keyboards and mice. You can also use a “USB adapter” keyboard/mouse (for example, many Logitech devices have a USB “receiver” that plugs into a USB port and then the wireless devices connect through that receiver).
- Screen: Raspberry Pis are HDMI-ready devices that come with either ‘standard’ HDMI ports or ‘micro’ HDMI ports. You will have to figure out what your Pi has and also what kinds of ports are available on the screen you’d like to use – there are plenty of cables available for purchase once you know what each ‘end’ needs.
- Network access – this can be a hard-wired Ethernet or WiFi.
- Some earlier Raspberry Pis (versions 1 and 2) do not have WiFi (a USB WiFi adapter is pretty cheap if WiFi is the best approach for you). The ‘Zero’ line does not have Ethernet.
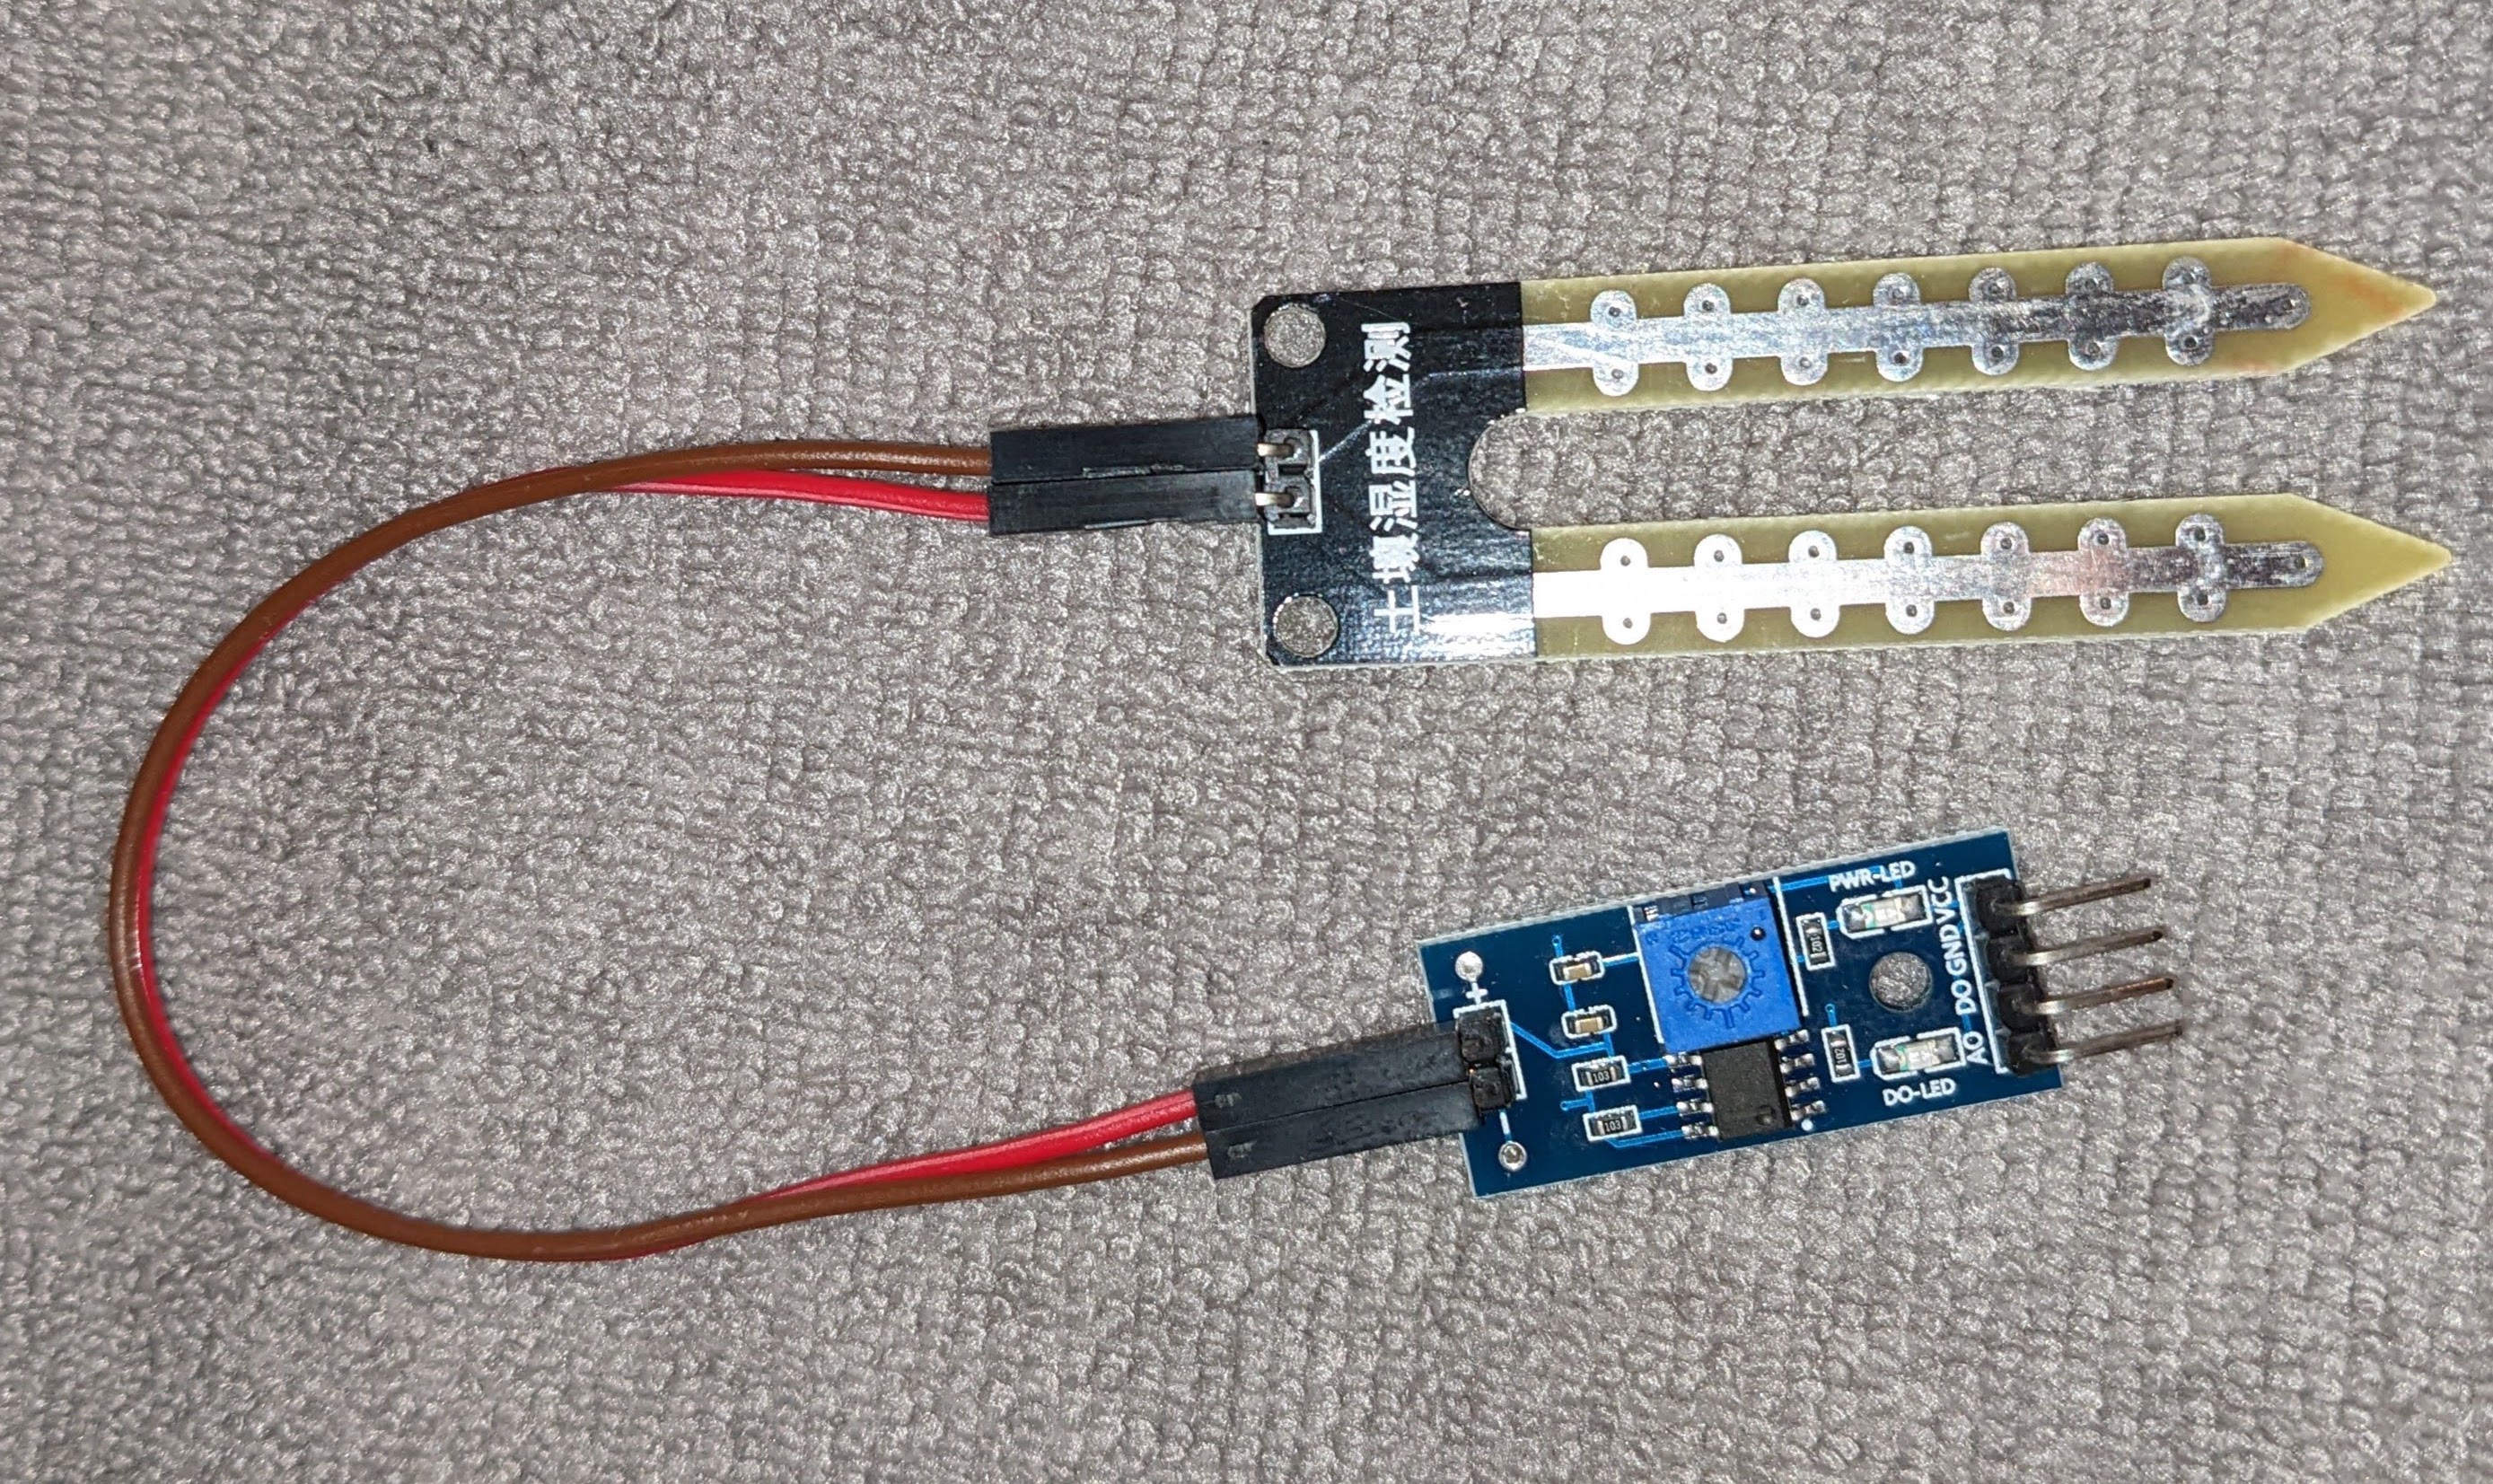
- This project uses a moisture sensor based on the LM393 module.
While this sensor can be used to detect levels of moisture, we are using it to detect the presence of water.
At the time of this writing, this page on components101.com shows what the LM393 ‘module’ looks like and the moisture sensor ‘blade’ that goes with it. Searching for ‘raspberry pi moisture sensor’ will usually show this pair (module + blade). This module + blade often comes in a package with the necessary wires that connect the blade to the module and the module to the Pi. At the time of this writing (2022 September), I am seeing 5-packs of these module + blade for around $10 USD.- This project will set up one sensor and then show how to set up multiple sensors. Do note that adding a lot of sensors that do not have their own power-supply (like these LM393 modules) can draw too much current and make the Pi not have enough amperage to run! In my own home, I have had no problem running 5 sensors on my Pi 2 with a 2.5 watt power supply.
- If the sensor(s) is going to be installed more than a few inches from the Pi, you can use simple “bell wire” which is usually around 20-gauge and comes as two wires wrapped together. At the time of this writing, 50 feet can be purchased for around $12 USD. “Bell wire” is about the same diameter as the pins on a Pi which is the same as most ‘breadboard’ wires and accessories. In my home, I use a ‘female to female’ breadboard ‘jumper wire’ between my pi and the “bell wire” and then I use the included two-wire pair (which are also ‘female to female’) to connect the “bell wire” to the blade.
- Another computer with access to the Internet plus any necessary card-readers so that the computer can read/write a MicroSD card. Some laptops these days come with a MicroSD slot, otherwise there are USB-to-Multiple-Card-Format adapters available for purchase for anywhere from $5 to $25 USD. Search for “usb card reader”.
Setup
If setting up a Raspberry Pi’s OS is new to you, head over to this post to learn how to set up your Pi.
Moisture Sensor Setup
The LM393-based packages usually come with two ‘sets’ of wires: one with 2 wires and one with 3. The 2 wire set is used to connect the ‘blade’ to the pair of pins on the module. The 3 wire set will connect the module to the Pi. Here is how to do that:
- LM393 to the Pi: There are a few steps to this, starting with the need to pick the pins on the Pi that will be used to (a) power the module and (b) communicate with the module.
As the LM393 can use between 3.3 and 5 volts, either of the two voltages offered by the Pi are fine. All Pis – whether a 26 pin Pi or a 40 pin Pi – share a common configuration in the first “set” of pins (here is a link to a nice ‘pinout’ diagram – these images come-and-go over time, search for “raspberry pi pinout diagram”).
This project is using pin #4 for ‘power’, but you can pick any “DC Power” on the Pi and connect it to the “VCC” pin on the LM393.
Same for the ground: this project is using pin #6 for ground but you can replace that with any “ground” pin – just connect it to the “GND” on the L393.
One can use any “GPIO__” pin for communication to the LM393. This project uses pin #3, but feel free to use another GPIO pin – just note which one you are using and modify the Code (below) with your choice.
This wire will go to the “DO” pin on the LM393 – “DO” stands for “digital out” as opposed to “AO” (the last pin on the LM393) which stands for “analog out”. Since this project only cares about “yes there is water” or “no water found”, the “DO” pin (which is either ‘on’ or ‘off’) is the right option..
(click image to see larger version)
For this project:
+ the power (VCC) will connect to the Pi’s pin #4
+ the ground (GND) will connect to the P’s pin #6
+ the communication (DO) will connect to the Pi’s #3
(click image to see larger version). - LM393 to Blade: Take the 2 wire set and connect one side to the blade and the other side to the LM393 – it does not matter which blade pin connects to which LM393 pin..
(click image to see larger version).
Code
Needed Software (Dependencies)
This project needs Python 3 and the Python3 RPi.GPIO package.
Command Line:
sudo apt updatesudo apt install python3 python3-rpi.gpio
Desktop > Menu (upper left of screen) > Preferences > Recommended Software > Search for and install:
- python3
- python3-rpio.gpio
There are often API libraries available by many message providers (Google, AWS, etc.). The sample-code provided in this post uses Twilio for SMS and SendGrid for email – both have super nice Python libraries. Sometimes providers require OS-level package installation, but often (like Twilio/SendGrid) the libraries are available via a Python package manager like pip:
sudo apt install python3-pippip install sendgrid twilio- Or on the Pi’s desktop using “Recommended Software”, install “python3-pip”
.
Let’s Program!
All of the finished code can be found in this public, GitHub repo: https://github.com/dmalouf/RaspberryPiWaterNotification
Let’s start by writing just enough code to print a message in the terminal when water is sensed.
First step is to get your Pi and water-sensor wired up and powered using the instructions above.
Second step is to find a place on your Pi’s system to save code. For this post, the code will be in the folder: /home/pi/code/WaterDetection (also know as: ~/code/WaterDetection). Use the following command to create the folder (or use the Desktop to create the folders): mkdir -p ~/code/WaterDetection
This post will refer to this file as main.py (feel free to use a different name for the file being sure to use that name instead of main.py in the rest of this post).
In whatever editor you wish (some IDE (search for “python ide”), a simple text-editor, command-line vim, etc.), let’s start with the following code. Feel free to not include the comments as they are a bit verbose but helpful for this post.
# main.py -- Get access to the pins
# See this site for more details/examples:
# https://sourceforge.net/p/raspberry-gpio-python/wiki/BasicUsage/
import RPi.GPIO as GPIO

# The 'DO' communication pin chosen during
# Setup > Moisture Sensor Setup
pin = 3

# Setup the GPIO module to 'listen' on the `pin`
GPIO.setmode(GPIO.BOARD)
GPIO.setwarnings(False)
GPIO.setup(pin, GPIO.IN)

# "Testing" that the pin is working
print(f"Initial value of pin #{pin} is {GPIO.input(pin)}")
In a terminal, get to this code (in this post, that would be cd /home/pi/code/WaterDetection) and run it: python3 main.py
This should produce a very simple output of: Initial value of # (where # is either zero or one)
A quick Hardware excursus
It will be important to note the value that is returned in the above script… but first we need to finish the setup of the LM393 setup. The LM393 has a small potentiometer that is used to adjust how much moisture triggers the ‘DO’ pin. In the picture below, the potentiometer it is the small, blue square that has a Phillips head slot in the middle.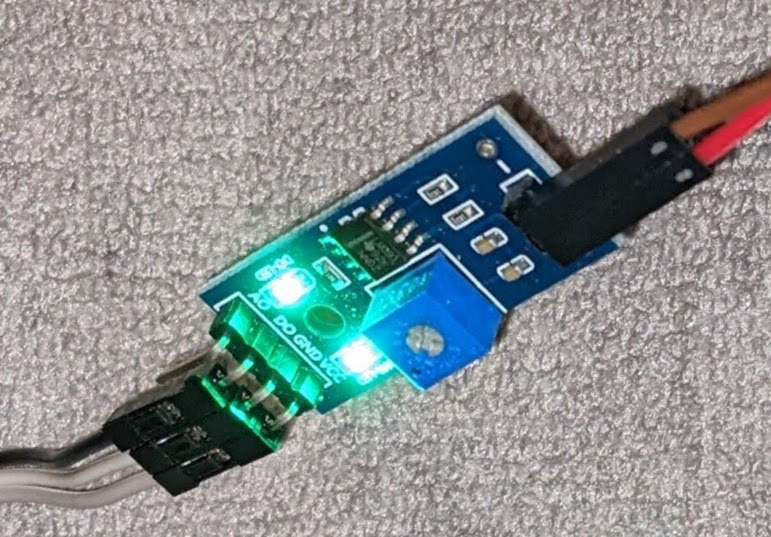
(click image to see larger version)
Assuming the Raspberry Pi is up-and-running and that the LM393 and blade are wired up, you should see one or two LEDs lit up.
To calibrate the LM393, use a small, Phillips head screwdriver to slowly turn the gray potentiometer until both LEDs light up. Then slowly turn the potentiometer the opposite direction until only one LED is lit. The goal is to barely get the second LED to go out.
Now, get a small cup of water that is at least a few inches / 5 to 10 centimeters deep and place the pointed-tops ends of the blade into the water (see the picture at the top of this post). This should make the second LED light up. Pulling the blade out of the water should make the second LED light go out. If not, continue to slightly adjust the potentiometer until the blade in-the-water makes the second LED light up and out-of-water makes the second LED go out.
Back to coding
With the blade out of the water, run the script: python3 main.py Note the value that is returned: 0 or 1
Put the blade in water (again, pointed-ends go in the water) and with the blade in the water, run the script again. This should return the ‘opposite’ value, relative to when the blade is out of the water: 1 or 0
The value when the blade is in the water will become important later, but let’s add it to the code now, right below the setting of pin:
# The 'DO' communication pin chosen during
# Setup > Moisture Sensor Setup (this line is the same as above)
pin = 3
# The value will be 1 or 0 - whatever is returned when running
# this code with the blade in the water
on_value = 1
Now let’s setup a ‘listener’ on the pin so that whenever the pin’s value is the same as on_value (i.e. water is sensed), a notification is triggered. This page on the RPi.GPIO module’s documentation page goes into more details / examples on using an ‘input’ pin – https://sourceforge.net/p/raspberry-gpio-python/wiki/Inputs/ – and is the basis of the code below.
# This code comes right after the "# Setup the GPIO module code above"
# A simple function that prints the GPIO pin's
# value to the terminal
def listen_and_log(activated_pin):
    print(f"Activated Pin = {activated_pin}")
    print(f"Value = {GPIO.input(activated_pin)}\n")

# Set our `pin` to be an 'input' pin
GPIO.setup(pin, GPIO.IN)

# Tell the GPIO module to listen for any change (see Note below) coming
# from `pin`, but not if the change was in the last 300 milliseconds
GPIO.add_event_detect(pin, GPIO.BOTH, bouncetime=300)

# The first argument is the pin that will be 'listened to', and the
# second argument is the name of the function (above) that will be
# called whenever the "add_event_detect" is triggered (e.g. whenever
# the value rises or falls)
GPIO.add_event_callback(pin, listen_and_log)
Note: I could not get the
GPIO.add_event_detectto care if the second argument isGPIO.FALLINGorGPIO.RISING… so I just stick withGPIO.BOTHand handle rising (from 0/off to 1/on) or falling (opposite) in my code.
A great feature of the RPi.GPIO module is the ability to add multiple listeners (callbacks)! Here’s the same code above but this time calling two callbacks.
# This code comes right after the "# Setup the GPIO module code above"

# TWO simple functions that prints the pin number and its value to
# the terminal
def which_pin(activated_pin):
    print(f"Activated Pin = {activated_pin}")

def what_value(activated_pin):
    print(f"Value = {GPIO.input(activated_pin)}\n")

# Set our `pin` to be an 'input' pin
GPIO.setup(pin, GPIO.IN)

# Tell the GPIO module to listen for any change (see Note below) coming
# from `pin`, but not if the change was in the last 300 milliseconds
GPIO.add_event_detect(pin, GPIO.BOTH, bouncetime=300)


# The first argument is the pin that will be 'listened to', and the
# second argument is the name of the function (above) that will be
# called whenever the "add_event_detect" is triggered (e.g. whenever
# the value rises or falls)
# Notice there are now TWO callbacks called on each 'event'
GPIO.add_event_callback(pin, which_pin)
GPIO.add_event_callback(pin, what_value)
“Under the hood”, as the saying goes, this code asks the GPIO module to set up an ‘interrupt’ that is then listened to and then, when there is a state-change, fire-off the callback functions. For the use-case of this project, this probably makes the most sense (as opposed to ‘polling’ or constantly asking the
pinfor its state). Checkout the great documentation, though, for other ideas.
There is one, major problem with this code, though: it will send a notification whenever the ‘pin’ changes value – from “no water” to “water” but also from “water” to “no water”. So let’s use the on_value that was setup earlier to make our code only send a notification when water is present. We will address this in each callback function.
def which_pin(activated_pin):
    # Get the 'input' of the activated_pin
    value = GPIO.input(activated_pin)
    # If the value is the 'on' value, notify
    if value == on_value:
        print(f"Activated Pin = {activated_pin}")

def what_value(activated_pin):
    # Get the 'input' of the activated_pin
    value = GPIO.input(activated_pin)
    # If the value is the 'on' value, notify
    if value == on_value:
        print(f"Value = {value}\n")
Useful Notifications
Logging the state of the pin to the terminal is not really good enough. So as stated at the beginning of the post, let’s look at what it would be like to get a text or an email notification.
Instead of walking through all the lines of code needed to send an email or SMS notification, I am going to refer you to the GitHub repository I made to go with this post (here) highlighting the parts that need explanation.
First, you will probably need to make an account with whatever service(s) you want to use. For this post’s example, I am using SendGrid for email and Twilio for texting. If you want to do the same, you’ll have to make an account on each of those services. I chose those two for three reasons: (1) they have great APIs and modules (like the Python modules used in this post) that are super easy to use; (2) they are very inexpensive (often free); and (3) when creating a new account, both of these services do great job of giving you next-steps, including the creation of API keys and sample code to use.
Second, no matter what service(s) you use, there will almost always end up being some sort of key/password (or pair) that has to be used on every API request. For example, to send emails using the SendGrid API / Python-module, you can see in send_email_notification.py file that there is a single key used to tell SendGrid who ‘you’ are and that you have permission to send an email:sg = SendGridAPIClient(sendgrid_api_key)
For this post / sample-code, there is a file that contains a ‘sample’ of the values one needs to send SendGrid email as well as Twilio texts. You are free to not use this approach of putting keys, phone numbers, etc. into an “environment file” but instead hardcode the values into your Python code. One reason I am using this “environment file” approach is that it makes it very clear where keys are supposed to go: in the environment file. So if you want to use this approach as well, there are a few options for using “environment” variables.
- You can copy the “
sendgrid.env.sample” file, calling it whatever you like (ex. “.env” or “.sendgrid.env“), and then filling in the values as-needed. This file would then need to be ‘sourced’ whenever your water altering program is run. For example:source .envpython3 main.py - Another option is to just included the “export …” lines into an environment file in your operating system. Assuming you are using a Linux-like operating system on a Raspberry Pi, you can add the lines to the
/etc/environmentor/home/pi/.profilefiles.
Another option is to just paste the values into the top of the relevant files. For example, instead of using “os.environ['______']” in the following code-block from the file send_sms_notification.py, just put the actual values in the file:
# Variables used below
account_sid = 'whatever SID Twilio gave you'
auth_token = 'the auth token given by Twilio'
from_phone = 'the sending phone-number in your Twilio acct'
to_phone = 'the recipient of the message phone-number'
Third, take a peek at some of the other values at the top of the files. For example, there is a variable “debounce_in_seconds” that is used to prevent too many notifications being sent for what could conceivably be the same “event”. In my home, I set this to 5 minutes (300 seconds) because I want to be pestered about water in my house (haha) – if I’m 30 minutes from home I’ll get 6 text messages that together reinforce my need to get home quickly!
I tend to use files in the /tmp folder for storing things like “Last time I sent an email”. There are a lot of different ways to handle this kind of file: if you have your own approach, feel free to implement it.
Fourth, and most importantly, there is the issue of “Is a zero or a one the value that states that water exists?” This is the “on_value” from earlier in this post. One easy way to make this value available to all of the callback functions, is to use the os.environ functionality. You will see this in the sample code in GitHub.
Important Note: if using
os.environ, the value must be a string (even though we are dealing with numbers/integers). So be sure to cast the GPIO.input() value as a string to avoid any accidental mistakes when comparing the sensor’s value to theos.environvalue.
A wholly different approach is to set the on_value in the main.py file, and then have a single callback method in main.py that triggers all of the other notification functions. This single callback method would only trigger the other notifications if the pin’s value equals on_value (an example of this is demonstrated below in the for pin in [.... code block)
Taking this Further…
I included the file “alt_msg.py” which is a different approach to creating a callback: this file uses a Class and Python’s __call__() built-in method.
I also included the file “waterdetection.service” to show how one might use systemd to auto-start / keep-alive the main.py file as-a-service.
In my own home, I have 3 water-sensors setup. For this, one needs to write a loop over the a list of communication pins, setting them up and attaching callbacks. For example:
for pin in [3, 4, 22]:
    GPIO.setup(pin, GPIO.IN)
    GPIO.add_event_detect(pin, GPIO.BOTH, bouncetime=300)
    GPIO.add_event_callback(pin, pin_activated)
    GPIO.add_event_callback(pin, send_email_message)
    # all the other callbacks...
At this point, it may make sense to have a single callback function that calls all of the other notification functions:
def pin_activated(activated_pin):
    if str(GPIO.input(activated_pin)) == os.environ['on_value']:
        send_email_message(activated_pin)
        AltMessage(activated_pin)
        # ...
My hope is that you not only have a functioning water-detection system that can notify you of the presence of water, but you now have ideas, patterns, and/or examples of how you can create other notifications.

David, I appreciate all of your help, and I did get it working. There is a small error in your code, on line 8 in main.py, it states that os.environ “pin” instead of “WATER_PIN”.
Great program and great project!
Al
Thanks Al – I’ll fix that right now! Great catch!
And I’m glad you’re enjoying the project 🙂 It was a fun one for me, too!
David, I started over with bullseye, and I was able to load twilio. now my issue is that I have an error with my account_sid. Your help would be appreciated!!
pi@raspberrypi:~/code/WaterDetection $ source .env; python3 main.py
Traceback (most recent call last):
File “/home/pi/code/WaterDetection/main.py”, line 5, in
from send_sms_notification import send_sms_message
File “/home/pi/code/WaterDetection/send_sms_notification.py”, line 13, in
account_sid = os.environ[‘ACa436cf(***************************’]
File “/usr/lib/python3.9/os.py”, line 679, in getitem
raise KeyError(key) from None
KeyError: ‘ACa436cf************************’
So glad you got stuff ‘working’, Al!! Nice job!
Looking at the error, I’m wondering if you are putting your actual “account_sid” inside the square-brackets:
account_sid = os.environ[‘ACa4******’]
The way this code-base is set up is that you would put that ‘ACa4….’ value in your .env file on the line that starts “export TWILIO_ACCOUNT_SID=’
(maybe refer to the .env.sample file in the GitHub repo as an example)
Then in your code, do not replace the ‘TWILIO_ACCOUNT_SID’ in line 13 with your actual account_sid but just leave the line as-is
If I may explain: the use of the .env file means you do not put your actual passwords, keys, etc. in your Python files. You put these items in your .env file and then ‘refer’ to the items in the file using os.env[].
So if you put your account_sid in the .env file on a line that looks like this:
export TWILIO_ACCOUNT_SID='<your actual account_sid here, between the quotes’
Then you ‘refer’ to that variable using os.env[‘TWILIO_ACCOUNT_SID’] – the value in your .env file will be what gets set in the ‘account_sid’ variable (the beginning of line 13).
Does that make sense?
Yes, makes sense, I realized this about an hour ago. I’m very close, no errors, just not getting notified just yet. Thanks for your help!
Al
David, here you go.
pi@raspberrypi:~ $ cat /etc/*-release
PRETTY_NAME=”Debian GNU/Linux 12 (bookworm)”
NAME=”Debian GNU/Linux”
VERSION_ID=”12″
VERSION=”12 (bookworm)”
VERSION_CODENAME=bookworm
ID=debian
HOME_URL=”https://www.debian.org/”
SUPPORT_URL=”https://www.debian.org/support”
BUG_REPORT_URL=”https://bugs.debian.org/”
Hello, and thank you for this project. I am having trouble loading the sendgrid twilio program. The error is that python3 doesn’t support it any longer. Is there a work around?
Thank you,
Al
Hi Al,
I’m wondering if you might be able to provide me with a little more information? For example, at what point / during which step did you run into a python3 problem?
If it helps, here are some links I’m seeing for getting the libraries (as I think?!?! that may be the problem?):
-> Twilio Python: https://www.twilio.com/docs/python/install
-> SendGrid: https://github.com/sendgrid/sendgrid-python?tab=readme-ov-file#install-package
Perhaps the problem is that the SendGrid library does not install correctly anymore via `pip`?
I’d love to help you get unstuck!
David
David, thanks for your reply. This is the error I receive when I try to load twilio with python 3.
pi@raspberrypi:~ $ pip install sendgrid twillio
error: externally-managed-environment
× This environment is externally managed
╰─> To install Python packages system-wide, try apt install
python3-xyz, where xyz is the package you are trying to
install.
If you wish to install a non-Debian-packaged Python package, create a virtual environment using python3 -m venv path/to/venv. Then use path/to/venv/bin/python and path/to/venv/bin/pip. Make sure you have python3-full installed. For more information visit http://rptl.io/venvnote: If you believe this is a mistake, please contact your Python installation or OS distribution provider. You can override this, at the risk of breaking your Python installation or OS, by passing –break-system-packages.hint: See PEP 668 for the detailed specification.
Al
Hey Al,
I’m wondering if you might need to use the `apt` package to install the Python packages so that then `pip` can install?
I ran `apt-cache search twilio` and `apt-cache search sendgrid` on one of my Raspberry Pis and saw a package for Twilio that might be the solution: `python3-twilio`
So if I may recommend the following steps:
1. Run `pip install sendgrid` and see if that works (that is, not including `twilio` in this command)
2. Run `sudo apt install python3-twilio` and then run `pip install twilio`
My thought is that step #2 needs both parts. Hopefully that will work.
If step #1 also fails, let me know – including any responses you see in the terminal – and we can try to figure it out!
David
David, that failed too. I was able to install ‘sudo apt install python3-twilio’ but i could not run ‘pip install twilio’. Looks like the new installs of python3 prevent this next step.
I am using a raspberry pi 4b, but just tried this on my rpi 5 too.
Al
pi@raspberrypi:~ $ pip install sendgrid
error: externally-managed-environment
× This environment is externally managed
╰─> To install Python packages system-wide, try apt install
python3-xyz, where xyz is the package you are trying to
install.
If you wish to install a non-Debian-packaged Python package, create a virtual environment using python3 -m venv path/to/venv. Then use path/to/venv/bin/python and path/to/venv/bin/pip. Make sure you have python3-full installed. For more information visit http://rptl.io/venvnote: If you believe this is a mistake, please contact your Python installation or OS distribution provider. You can override this, at the risk of breaking your Python installation or OS, by passing –break-system-packages.hint: See PEP 668 for the detailed specification.pi@raspberrypi:~ $
Well this is getting annoying! (haha)
Okay, one more diagnostic question for you, Al. I use the following command to find the ‘specifics’ of the operating system that is running… this only works for Debian-based operating systems (Debian, Ubuntu, Raspbian, Raspberry Pi OS, etc.). So if you don’t mind running the following command and pasting the results, here’s what I’d like to ask:
For example, on one of my Pis, this is what the output looks like: